
INCREASE INTERNET SPEED
IN WINDOWS 7

Use SG TCP Optimizer
The speed of Internet is the speed by which your PC sends and receives packets of data through your network. Of course, this speed depends on the network’s strength, but along with that, it also depends on the TCP/IP Configuration Settings. Thanks to SG TCP Optimizer software that help us in tweaking the TCP/IP settings in the way so that we can have maximum Internet speed. This software is used by many, and all of its users admire it. Below are the steps to be followed to use SG TCP Optimizer.
- If you don’t have SG TCP Optimizer with you, then consider getting one from this link.
- Installing this software is quite easy. After Installing, just run it. Here is the screenshot of user interface of this amazing software.
- As you can see in the above screenshot, there is a slider. Drag it to the point which is speed provided by your Internet Service Provider.
- Also, there is an option ‘Optimal’ that lies at the bottom right side. Make sure to select the radio button next to it.
- Click on ‘Apply Changes’ to save the settings that you just made.

De-allocate the Bandwidth Limit
When it comes about increasing Internet speed in Windows OS, the first and foremost way, that is used by many, is de-allocating the bandwidth limit. By default, the Windows allocates some bandwidth limit, which results in slow Internet connection. By removing that limit, you can surely increase your Internet speed in Windows 7. De-allocating the bandwidth limit is quite simple. Just follow the below given steps.
- In the Run Dialog Box of your Windows, type gpedit.msc. Don’t know how to bring Run Dialog box? Just press Windows+R.
- A new window will open up. To make you sure that you are on the right track, I have provided the screenshot of that window below.

- In the above screenshot, you can see there is an option named ‘Administrative Templates’. Just click on it, and then click on ‘Network’.
- From the menu that expands on clicking ‘Network’, look for the option ‘QoS Packet Scheduler’. Click on it. Now click on Limit reservable bandwidth. Following is the screenshot of Window that will come up.

it is enabled put bandwith limit as 0 enjoy

http://www.speedguide.net/downloads.php
http://www.speedguide.net/downloads.php
CHANGING BY DNS SERVER

To increase Internet speed use any DNS service either OpenDNS or Google Public DNS.
OpenDNS
Apart from the aforementioned approach, you can also consider making use of OpenDNS in order to lift up the Internet Speed on Windows. The OpenDNS is known to offer complete protection as far as phishing attacks and botnet infections are concerned. Moreover, the OpenDNS is known to ensure that the websites are easily accessible. However, the cherry on the cake still remains the fact that the OpenDNS is an experimental service and thus the chances of additional features being continually added to the same always remains bright.
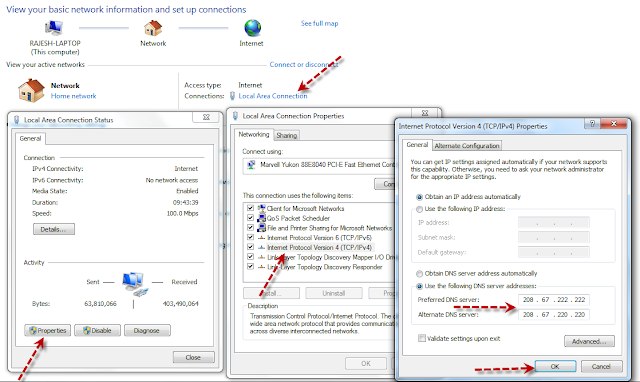
Click on Start Button then open Control Panel then go to
–> View Network status or Network and Sharing Center
–> Choose Your Network Connection
–> Properties
–> Check for Internet Protocol Version 4 (TCP/IPv4)
–> Click on Properties again
–> Enter Open DNS preferred IP addresses (208.67.222.222 for the Preferred DNS Server box and 208.67.222.220 for the Alternate one.)
–> Exit and go to your desktop.
–> Choose Your Network Connection
–> Properties
–> Check for Internet Protocol Version 4 (TCP/IPv4)
–> Click on Properties again
–> Enter Open DNS preferred IP addresses (208.67.222.222 for the Preferred DNS Server box and 208.67.222.220 for the Alternate one.)
–> Exit and go to your desktop.
Open Run Windows (“Windows button + R” or open Run Window from Start Menu) Type ipconfig/flushdns in the black box that appears on the screen. The process of installing OpenDNS on your computer is now complete
THANKS
No comments:
Post a Comment